I.Keras保存模型
1 | model.save("unet.h5") |
II.Keras模型转换TF模型
1 | python keras_to_tensorflow.py |
可能遇到的问题是找不到自定义loss,查看相关issues可以找到解决方案。
III.TensorBoard查看模型
1 | import tensorflow as tf |
然后使用TB查看输入与输出1
tensorboard --logdir ./log --host 127.0.0.1 --port 4321
可以查看到输入类似这样,这个层的名字C++调用的的时候需要完全匹配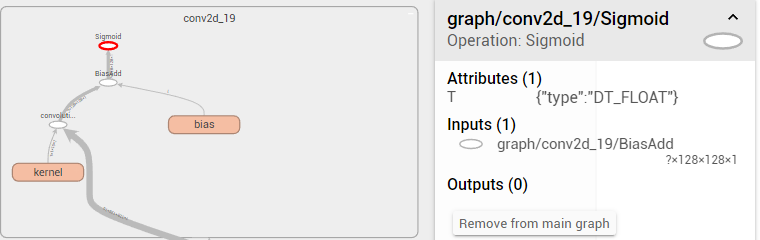
IV.C++调用TF模型进行前向计算
- 点此下载合适的TF预编译DLL(不必与Python训练版本一致),注意不要自行编译,费时又费力坑又多。
输入参数转换为Tensor
1
2
3
4
5
6
7
8
9
10
11
12
13
14
15
16
17Tensor Image2Tensor(Image& input)
{
// 创建tensor
tensorflow::Tensor image_input = tensorflow::Tensor(tensorflow::DT_FLOAT,
tensorflow::TensorShape({ 1, input->GetDimensions()[0], input->GetDimensions()[1], 1 }));
float *tensor_data_ptr = image_input.flat<float>().data();
for (int y = 0; y < dims[1]; y++)
{
for (int x = 0; x < dims[0]; x++)
{
*tensor_data_ptr = input[x][y]/255.0;
tensor_data_ptr++;
}
}
return image_input;
}TF载入模型前向计算
1
2
3
4
5
6
7
8
9
10
11
12
13
14
15
16
17
18
19
20
21
22
23
24
25
26
27
28
29
30
31
32
33
34
35
36
37
38
39
40
41
42
43
44
45
46
47
48
49Session* session;
Status status = NewSession(SessionOptions(), &session); // 创建新会话Session
string model_path = "model.pb"; // 保存的模型路径
GraphDef graphdef; // 当前模型的图定义
Status status_load = ReadBinaryProto(Env::Default(), model_path, &graphdef); // 从pb文件中读取图模型;
if (!status_load.ok())
{
std::cout << "ERROR: Loading model failed..." << model_path << std::endl;
std::cout << status_load.ToString() << "\n";
return -1;
}
Status status_create = session->Create(graphdef); // 将图模型导入会话Session中;
if (!status_create.ok())
{
std::cout << "ERROR: Creating graph in session failed..." << status_create.ToString() << std::endl;
return -1;
}
cout << "Session successfully created." << endl;
// 开始进行预测
std::vector<Tensor> resized_tensors; // 用于保存读取的图片的tensor数组
auto image_tensor = Image2Tensor(image); // 获取输入Tensor
const Tensor& resized_tensor = image_tensor;
std::cout << resized_tensor.DebugString() << endl; // 打印出输入模型的tensor形状
vector<tensorflow::Tensor> outputs;
string output_node = "conv2d_19/Sigmoid"; // 模型输出层
// 开始预测,这里的输入名images要和模型的输入相匹配
Status status_run = session->Run({ { "input_1", resized_tensor } }, { output_node }, {}, &outputs);
if (!status_run.ok())
{
std::cout << "ERROR: RUN failed..." << std::endl;
std::cout << status_run.ToString() << "\n";
return -1;
}
// 取出输出值
std::cout << "Output tensor size:" << outputs.size() << std::endl;
for (std::size_t i = 0; i < outputs.size(); i++)
{
std::cout << outputs[i].DebugString() << endl; // 打印出模型输出的tensor的形状
}
Tensor result_tensor = outputs[0]; // 取出第一个tensor
详细例程可以参考此链接